Lights

 LED lights
Lights

 LED lights
 I have this configuration working on 4 bikes. Generally it is two LEDs
in series, each series string in anti-parallel with each other for a
total of 4 LEDs per dynamo. I've even experimented with optionally
adding a supercap across *one* LED in each string to work as a
standlight. If you add a supercap across every LED, your system won't
work optimally and you'll need to resort to a bridge rectifier or other
blocking diodes to regain the advantage.
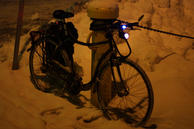
I've been using a Shimano HB-NX60 front hub dynamo for a number of years now and have been extremely pleased.
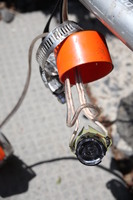
The orange back cap is soft plastic. poke a pair
of holes touching each other with an awl for each wire pair to make an
"8"-like hole for the zip cord to go through without much space around
it to help keep water out.
When mounting, I put the holes facing downwards and the wire leading out
downwards to try to keep water from trickling in.
Since the LEDs are in series, don't cut one of the
wires in the pair as it passes through to the other assembly. The dot
on near the solder pad indicates positive. Use the ribbed or white
striped wire as the negative.
The plastic lens is a stiff clear plastic that comes from "blister pack" packaging.
It is held in place between the screw cap and the gasket.
In behind the LED thermal mounting plate, I usually put a thermal slug,
then usually add wads of bubble wrap to push the assembly forwards into
the blister pack "lens".
Sometimes, with thick enough wire and very snug holes in the back cap
for the wires, the pressure from the wires is enough to hold everything
in place.
The extra black cylinder is a 1F supercap across
the terminals of one LED to make a german standard "standlight".
(previous bike lighting writeup)
Dynamos (Dynohubs)
I'm about to purchase another four Shimano DH-3N72 dynohubs to equip
more bikes.
I never need batteries and they are visible a kilometer away.
More recent designs have added a 1Farad supercap to make a German
standard standlight.
Photos
 Light
assembly from a Luxeon Star/O 1Watt LED assembly with collimator fitted
into a 1 1/4" plumbing drain compression fitting (ABS or PVC?). Wire is
16 AWG lamp cord (zip cord) used mostly for mechanical durability since
22 AWG would be fine electrically.
Bridge:
            +---------------+--------------+
            |               |              |
            |               |              |
    +-------+-------+       v +->          ^ +->
    |               |       |              |
    |               |       |              |
    |               |       |  + + + -     |
    |   6V A/C      |       +----| |-------+
    |               |       |    + +       |
    |               |       |              |
    +-------+-------+       ^ +->          v +->
            |               |              |
            |               |              |
            +---------------+--------------+
False bridge:
            +---------------+--------------+
            |               |              |
            |               |              |
    +-------+-------+       v +->          ^ +->
    |               |       |              |
    |               |       |              |
    |               |       |  + + + -     |
    |   6V A/C      |       +----| |-------+
    |               |       |    + +       |
    |               |       |              |
    +-------+-------+       v +->          ^ +->
            |               |              |
            |               |              |
            +---------------+--------------+
)
Other resources
Acknowledgements
Thank you to
Martin Hicks and the BikeCurrent mailing list
for provoking this writeup.
(C) 2002 Richard Guy Briggs Web
Page last updated by
Richard Guy Briggs
Tue Dec 11 21:24:01 EST 2012